If your thing is not to waste time in the mountains changing cameras or to fix punctures, or maybe you compete and a puncture for you means losing the race, or you are looking for advantages in technical zones with low pressures that will make you better adapt to the terrain, this is your method (applies to all types of bicycles; mtb, gravel and road).
Before going into detail, we clarify that in this article, we refer to as a rim what in some other countries is called a rim (or rim) and as a tire cover. You can also read best mountain bikes under 500.
How to tubelize the wheels of your bicycle?
Materials and tools to tubelize your wheels:
- 2 tires (preferably in good condition or new)
- 2 covers (preferably in good condition or new)
- 1 roll of tubeless tape of suitable width for the rim
- 2 tubeless valves
- Sealant liquid
- Rags, paper, and cleaning fluid
- Detachable (preferably iron)
- Foot pump or compressor
Step 1 – Clean the rim very well
If you start from a used tire, make sure it is compatible. Remove the rim tape if you have it (tie in some countries) and take the opportunity to measure the width and write it down. Once you have removed it, clean the inside of the rim very well of possible remains of dirt, glue, etc.
We recommend that the rim is in the best condition since if it has a bump and is deformed it may not seal properly.
The compatible tubeless rim will not have the spoke holes sealed, so you will need to do it yourself. Do not worry, it does not have any complications and then we will tell you how.
If you opt for the UST, you could go directly to step 6. These rims are completely watertight and are mounted together with a tire with the same characteristics. If the compatibility between rim and tire is good, you will be able to achieve the seal without the need for liquid during assembly. The market here is much smaller, so keep that in mind.
If you opt for a tubeless ready, the spoke holes are already sealed with tubeless tape and sometimes include the corresponding valves, so you can go directly to step 4.
Step 2 – Seal the rims with tubeless tape
To do this, you need the tape to be the same width as the inner profile of the rim. If it had a rim tape and when you took it out you have measured it. You already have the width you need.
Otherwise, the most effective thing is to look at how much it measures according to the manufacturer. If you are clear about the brand and model, look it up. If not, measure the inside, taking into account the curvature so as not to have problems and that the tape is too narrow. A little trick is to place a sheet of paper snugly against the bottom of the rim to make sure of the measurement.
Adhere the tubeless tape along the entire inner circumference of the rim. Start at the spoke hole closest to the valve hole and work back over it so that the ends of the tape overlap. Be careful to stretch and press to properly stick the tape, adapting it perfectly to the inner curvature of the rim, taking care that there are no folds or bubbles that could cause air leaks.
A trick to make sure that the tape is perfectly glued is to place a thin valve tube, mount the tire and inflate the tube, leaving it on for a few hours so that the expansion of the tube adapts to the contour of the rim and fixes the tape even more.
Step 3 – Place the valves on the rim
Using an awl, fine screwdriver, or scissors, poke a small hole in the tape over the hole where the valve will be housed. Then carefully insert the valve from the inside of the rim outwards. Then place the flat gasket and tighten the valve nut well so that it seals the hole perfectly. Some valves have a small internal screw in the base that reinforces this tightening and thus avoids possible leaks.
Make sure the rubber valve seal is sitting perfectly on the inside of the rim. There is nothing worse than finishing the entire process to discover an air leak in the valve.
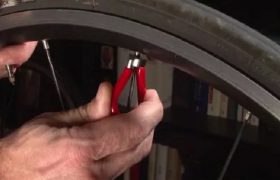
Step 4 – Mount the cover
Once the spoke holes have been taped and the valve installed, it is time to mount the cover. There are covers that cost more work than others. If you are having difficulties, you can help with removable ones.
Begin to mount both beads of the cover starting from the valve area, but leave the opposite end of the valve without completely closing to be able to add the sealing liquid through that area.
In case you are going to put anti-puncture foam, mount only one of the sides of the cover to be able to insert the foam.
Step 5 – Place the anti-puncture foam (OPTIONAL)
If you have followed the previous step and have decided to add a puncture-resistant cloud/mousse/foam, you will only have one side of the cover in place. Insert the foam between the rim and the tire and proceed to close the other side of the tire, leaving an opening to introduce the sealing liquid.
On tires with a rigid or inflexible rim, you may find it difficult to fit the tires. Help yourself with removable iron ones better than the typical plastic ones to do it more comfortably.
Step 6 – Add the tubeless liquid
The next step is to fill the wheel with sealant. Follow the manufacturer’s instructions for adding the amount of sealant you need. If you have no questions or are in doubt, some standards suggest an amount of 80-100ml per 27.5″ wheel for mountain biking. Reduce or increase by about 20 ml if your tire is 26 or 29 “.
Keep in mind that you will have to replenish the liquid depending on how long you use it and the terrain or conditions through which you move. The most common is every 3 months.
In some cases, you can do it through the valve, either directly from the container or with the help of a syringe and a tube that is attached to the valve. Alternatively, you can make sure of the amount you have left by opening the cover a little and refilling as we did the first time.
Step 7 – Close the cover
After having filled the tire with the required amount of sealant, turn the wheel 180º so that the tubeless liquid remains in the part that is closed on both sides and closes the tire completely. You can help with the removable ones if necessary.
Step 8 – Inflate the wheel
Place a pump (preferably standing) on the valve and cross your fingers to seal everything correctly the first time. As you increase the pressure, you will hear how the deck heats. Do not panic. Make sure it is beading properly by looking at the edges of the tire near the rim. Normally the tire has a parallel line that sticks out and tells you if it is correctly beaded.
Don’t be afraid to hit the maximum pressure listed on the side of the tire and use it at that pressure during your first ride. This will help to properly distribute the sealant throughout the deck. At home, be careful to turn the wheels from time to time so that the liquid is distributed throughout the interior surface of the tire.
Step 9 – Enjoy your new tubeless!
Check before leaving that the wheels are holding pressure. After making it roll a bit, you can now adjust to a pressure that you feel comfortable and according to the conditions of your route.
It’s always a good idea to carry a spare camera just in case you break your beads. However, this is especially important when you are testing new tubeless.