Today I’m gonna show you how to adjust front and rear brakes. There is we come on with some basic and advanced issues. So, let’s start to get the right fix.
Loosen the Tension
The first step is that is very necessary that most people forget that you really have to loosen the tension. So you don’t want to adjust the brakes. Was there any tension on the cable?
You can undo this part and this is easy for getting the wheels out If you have a flat, you can undo that and you also want to take a five-millimeter Allen wrench and undo the cable.
If you want to keep away from this problem you should take the best beach cruiser bike.
Adjust Brake Pad
Now the next step is to adjust the brake pad itself. The second that comes from the factory will rarely be the right positioning.
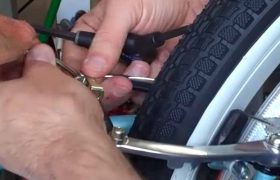
I would never use and I would always want to loosen that up with your five-millimeter Allen wrench. again, get that completely loose.
You want to push the lever up against the rim and make sure that the pad itself is parallel with the rim and is also the face of it is flush against the rim and you do need that to both sides.
Then we can come around to the handbrake while it’s still loose.
you’ll find it here on the handbrake. There are two parts. There’s the cable tensioner, as well as the lock nut, they have slots in them.
In the lineup with a slot by the handbrake you can pull the cable out and this is so that you can route the cable. In the most aesthetic and also efficient way didn’t like that and then adjust it.
So the slots don’t match up so that the cable won’t slip out again and this also if you need to do micro-adjustments to the cable can be used to make it tighter or looser, but generally, we don’t want to use that.
If we don’t have to. So let me come back to the brakes in the back and you can go ahead and slip the little quick release apparatus together.
Grab your five-millimeter Allen wrench again, you’re going to want to squeeze it in all the way and then back it off a little bit.
Now this will take a little trial and error. So, you get the exact right tension on it. Do you want to check it with your bike handbrake? Is it a good squeeze like this and see if that feels like it’s right for you?
It feels good. I’ve got one more step up here. Just take some time and what this will do well, even the tension between the two levers, which are separate units, and make sure that they are centered.
So, the wheel doesn’t rub on either side, these are adjusted perfectly, but if one is weak, weaker than the other, you can use this screw right here, going in, actually pushes in on the spring that forces the lever over.
I’m going against the cable so you can adjust this either in to make this lever stronger or out to make it a little bit weaker and you can give it to us and it will even break out for you so that it won’t rub on the wheel and that’s all there is to it and we go up to the front brakes, same similar price.
Handbrake
So, with the front brake, the cable is not even attached to the handbrake. So, we’ll have to address that and how you do that. It’s very simple again with both brakes and also with gears, you always want to loosen the cable.
That’s the first and this is nice and loose and we can go ahead over to the handbrake and line up the slots again in the tension nut and the lock nut here.
We’ll find this tab here on the handbrake, and you can slip the cable into that into here, and then just spin these away.
So, if the slots don’t line up, then once again, take your five-millimeter Allen wrench down to the pads. Regardless of the setting that they come with.
You always want to go ahead and loosen them completely and then push the lever in making sure the pad is nice and flat against the rim and also parallel with the circumference of the rim and do it on both sides.
You can see here and may get it nice and loose and push that lever all the way in and that will cause the pad to go flat against the rim and then all of a sudden with it their conference.
Now I’ll go ahead and put the quick release in here while the cable is still loose, actually going to route it this way and then run it through the other lever, cinch it up nice and tight.
Then back off a little bit from that, and then use your five millimeters that we’ve been using again, all you need is a five-millimeter wrench.
For all these parts check with the hand lever, whether that’s the attention you want. This one wants to be a little bit closer, so I’ll pull it in, make it a little tighter.
This lever here appears to be a little bit stronger and It’s pulling away from the wheel. You can tell it’s rubbing on this side. So, I want to go ahead and take my Phillips screwdriver.
Get the screw right here. I’m going to turn it right as though I’m tightening that we’ll push on the spring mechanism and string from the spring on that.
I’ll give it a few squeezes. It’s still not quite strong enough, so I can go over here and loosen this one, which will make the spring on this side effectively weaker and when I squeeze the lever again, shouldn’t even out that’s perfect.
Conclusion
Beach cruiser bike is now one of the popular options but when you talk about its assembling especially the front and rear part there is some key you should know.
If you want to learn more you can go OutdoorXsports for detailed guidelines.