
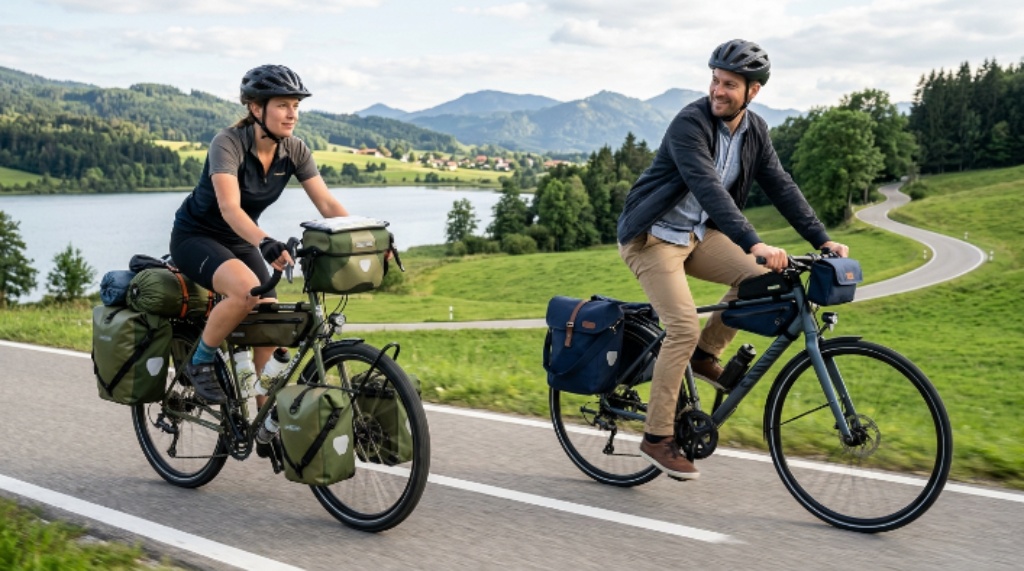
A commuter bike bag should fit your cargo, your bike, and your routine. Start with a bag type, then match its capacity, mounting system, weather protection, and access style.For daily commuting, panniers often provide the best balance of capacity and stability. Touring usually benefits from larger panniers, handlebar bags, frame bags, or a coordinated combination. The right setup also keeps weight balanced, protects essentials, and avoids contact with your wheels.
Cyclists commonly measure bag capacity in liters, making comparison easier across different designs. A 20 liter bag can hold considerably more than a small saddle pack, while still remaining manageable for daily travel.
However, capacity alone should never decide your purchase. The smarter approach treats a bike bag as part of your riding system. Consider what you carry, how often you stop, where you ride, and how quickly you need access.
Start With Your Actual Riding Routine
The best bike bag depends heavily on what your typical ride requires. Someone carrying a laptop and lunch needs different storage than someone carrying camping equipment.
Before comparing products, write down everything you normally carry. Then separate those items into daily essentials, occasional gear, and emergency supplies.
Consider these questions:
- Do you commute every weekday or ride occasionally?
- Do you carry clothing, food, electronics, tools, or documents?
- Do you ride through frequent rain or humid conditions?
- Do you need to remove the bag quickly after parking?
- Do you regularly carry groceries or unusually shaped items?
- Will you use the same bags for overnight or multi day trips?
These answers reveal your real storage requirement. They also prevent you from buying a large bag that adds unnecessary weight and bulk.
Understand the Main Types of Bike Bags
Bike bags serve different positions and purposes on a bicycle. Learning those differences makes the selection process much easier.
Panniers for Everyday Cargo
Panniers attach near the rear or front wheel using a rack. They provide substantial storage while keeping cargo away from your back.
For commuting, rear panniers work especially well for clothing, work equipment, groceries, and lunch. Many models also include shoulder straps, allowing you to carry them after parking.
A pair of panniers can distribute weight across both sides of the bicycle. Therefore, they often feel more stable than carrying equivalent cargo in one large bag.
Look for secure mounting hooks and a reliable locking mechanism. A loose pannier can shift during turns and create dangerous contact with the wheel.
Handlebar Bags for Quick Access
Handlebar bags sit near the front of the bicycle and keep frequently needed items within reach. They work well for snacks, maps, sunglasses, small cameras, and personal accessories.
Many touring cyclists use them for items needed during regular stops. However, heavy loads can affect steering and handling.
Choose a handlebar bag with enough support for its intended load. Also, check that cables, brake levers, and lights remain unobstructed.
Frame Bags for Efficient Storage
Frame bags fit inside the bicycle frame triangle. They use space that would otherwise remain unused.
These bags work particularly well for tools, spare tubes, chargers, snacks, and compact clothing. Their central position also keeps weight close to the bicycle’s center.
Measure your frame carefully before ordering one. Different frame shapes can create significant differences in usable bag dimensions.
Saddle Bags for Compact Loads
Saddle bags attach beneath the seat and provide convenient storage for small essentials. They remain popular because they add little visual bulk.
Use them for spare tubes, tire levers, multitools, keys, and emergency supplies. Larger models can hold additional clothing or compact personal items.
Avoid placing heavy equipment inside a large saddle bag. Excessive rear weight can affect handling and cause unwanted movement.
Trunk Bags for Mixed Commuting Needs
Trunk bags sit on top of a rear rack and provide a useful middle ground. They offer easier access than traditional panniers while providing more capacity than small saddle bags.
Many designs include side compartments that expand into panniers. This setup works especially well for riders who alternate between light commuting and larger shopping trips.
Choose a trunk bag when top access matters more than maximum carrying capacity. Also, check whether its mounting system matches your existing rack.
Match Storage Capacity to Your Cargo
Storage capacity should reflect what you carry rather than what looks impressive. Oversized bags encourage unnecessary loading and can make your bicycle harder to handle.
For light commuting, approximately 10 to 20 liters can cover daily essentials. Medium loads often need around 20 to 35 liters, depending on clothing and equipment.
Touring demands more planning because your cargo expands quickly. Longer trips may require separate storage for clothing, cooking equipment, sleeping gear, food, and repair supplies.
Instead of filling every available space, divide your equipment into categories. This approach makes packing faster and helps you locate important items during the ride.
Use this simple capacity guide:
- 10 to 15 liters: tools, snacks, electronics, and personal essentials.
- 15 to 25 liters: work clothing, lunch, electronics, and daily supplies.
- 25 to 40 liters: larger commuting loads, groceries, or short touring trips.
- 40 liters and above: extended touring with substantial equipment.
These ranges provide useful starting points rather than strict rules. Your packing style, clothing choices, and equipment sizes can change the actual requirement.
Choose the Right Mounting System
A great bag becomes frustrating when its mounting system feels unreliable. Therefore, inspect how the bag attaches before considering cosmetic features.
Rack mounted bags require a compatible rack with enough strength and clearance. Check the rack rating and compare it with your expected load.
Quick release systems make daily commuting easier. You can remove the bag when you arrive without spending several minutes adjusting straps.
Some bags use adjustable hooks that fit different rack designs. Others require specific mounting hardware, so confirm compatibility before buying.
Frame and handlebar bags often use straps instead of rigid mounting hardware. Straps provide flexibility, but they need proper adjustment to prevent movement.
After installation, check every contact point. The bag should remain stable while you brake, turn, stand on the pedals, and ride over rough surfaces.

Prioritize Weather Protection
Weather protection matters because commuting rarely follows perfect conditions. Rain can damage clothing, documents, electronics, food, and other everyday cargo.
Water resistant fabric can handle light moisture, but it does not always provide complete protection. Waterproof construction usually offers stronger protection when rain becomes persistent.
Look for sealed seams, waterproof closures, coated materials, and roll top designs. A separate rain cover can provide another layer of protection during heavy showers.
For electronics, consider using an additional waterproof pouch inside the main bag. Redundant protection costs little and reduces the consequences of unexpected leaks.
Do not assume a bag remains waterproof forever. Fabric treatments and closures can wear down through frequent use, abrasion, and repeated exposure.
Think About Access Before Buying
Fast access can matter more than maximum capacity during daily commuting. You may need your phone, wallet, keys, or rain jacket within seconds.
Top opening designs provide straightforward access for many everyday loads. However, deep bags can make small items difficult to find.
Multiple compartments help separate equipment by purpose. Still, excessive pockets can create clutter and make packing less intuitive.
For touring, prioritize organization around your riding rhythm. Keep emergency tools and weather gear accessible without unpacking your main clothing compartment.
A useful rule involves access frequency:
- Frequent access: keep items near the top or front compartment.
- Occasional access: place items inside the main storage area.
- Emergency access: store tools and repair equipment separately.
This simple system can save time during roadside stops. It also prevents important equipment from disappearing beneath heavier cargo.
Check Weight Distribution and Bicycle Handling
A bike bag changes how a bicycle responds to steering, braking, and acceleration. Therefore, packing strategy matters just as much as bag capacity.
Keep heavier items low and close to the bicycle’s center. Avoid placing dense equipment high on the handlebars or far behind the rear axle.
With panniers, distribute comparable loads between both sides. If one side carries considerably more weight, the bicycle can feel unbalanced.
During touring, test the loaded bicycle before starting a long trip. Ride slowly first, then increase speed as you become familiar with the handling.
Also check your brakes after loading the bicycle. Additional cargo increases total weight and can change braking distance and control.
Consider Material and Construction
Material quality affects durability, weather resistance, and long term value. However, the strongest material is not automatically the best choice for every rider.
Heavy duty fabrics can tolerate frequent abrasion and rough touring conditions. Lighter materials can reduce total bicycle weight and suit minimalist commuters.
Inspect stress points rather than focusing only on the main fabric. Pay particular attention to seams, handles, attachment points, buckles, and closures.
A well constructed bag should maintain its shape when partially loaded. Weak panels can sag into moving components and create problems during riding.
Reflective elements also deserve attention for regular commuters. They can improve visibility when vehicles approach from behind or from side streets.
Match Bag Size to Your Bicycle
Not every bag works with every bicycle. Clearance around tires, racks, brakes, saddles, and cables can limit your options.
Measure available space before ordering. Then compare those measurements with the manufacturer’s stated dimensions.
For panniers, check heel clearance carefully. Your heels should not strike the bag while your pedals rotate.
For handlebar bags, inspect cable routing and steering clearance. A large bag should never interfere with braking or gear controls.
Frame bags require especially accurate measurements. Even small differences in frame geometry can prevent a bag from fitting correctly.
Make Security Part of Your Decision
Commuters often leave bicycles near offices, stores, transit stations, or public buildings. Your bag should therefore work with your normal security habits.
A removable bag makes sense when you regularly park outside. You can carry it indoors rather than leaving valuable equipment attached to the bicycle.
Some bags include attachment points for locks or security cables. These features can discourage casual removal, although they should not replace proper bicycle security.
Keep valuable electronics and personal documents out of unattended bags. A discreet design can also reduce attention compared with oversized technical luggage.
Decide Between One Bag and a System
One large bag may appear simpler, but a modular setup often works better. Different bags can handle different cargo types without forcing one bag to do everything.
A practical commuting system might include rear panniers and a compact frame bag. Touring can add a handlebar bag for frequently accessed items.
A modular setup also improves packing discipline. You can remove unnecessary bags when carrying less equipment.
However, avoid adding bags simply because mounting space exists. Every additional bag increases weight, complexity, and potential points of failure.
Practical Features Worth Paying Attention To
Some features provide genuine everyday value, while others mainly add visual appeal. Focus your budget on features that solve problems you regularly experience.
Prioritize these practical details:
- Secure mounting hardware that stays stable on rough roads.
- Waterproof construction or reliable rain protection.
- Reflective panels for improved visibility during darker rides.
- Reinforced handles for comfortable carrying after parking.
- Wide openings that make packing and unpacking easier.
- Internal organization for tools, electronics, and small items.
- Durable closures that remain reliable after repeated use.
- Replaceable or adjustable mounting components when available.
- Compatible attachment points for your existing rack or frame.
You do not need every feature on this list. Instead, rank features according to your route, cargo, weather, and parking situation.
Common Bike Bag Buying Mistakes
Many cyclists focus on capacity first and discover other problems later. Avoiding a few common mistakes can save money and frustration.
Buying the largest bag often creates unnecessary weight. Start with your normal cargo and add modest extra capacity for occasional needs.
Ignoring bicycle compatibility can create installation problems. Always confirm clearance, rack compatibility, mounting position, and attachment security.
Choosing weak weather protection can damage expensive electronics. If you ride through frequent rain, treat water protection as a primary requirement.
Overlooking access can also make daily rides inconvenient. Test how quickly you can reach the items you use most often.
Finally, do not judge a bag only by appearance. A practical bag should perform well when fully loaded, wet, dirty, and repeatedly removed.
A Simple Decision Process
You can narrow your options quickly by following a practical sequence. Start with your cargo, then evaluate your bicycle and riding environment.
Use this decision path:
- List everything you carry during your normal ride.
- Estimate the minimum storage capacity you actually need.
- Decide whether panniers, frame bags, saddle bags, or handlebar bags fit best.
- Confirm compatibility with your bicycle and rack.
- Check weather protection against your local riding conditions.
- Evaluate access based on how frequently you use each item.
- Consider weight distribution and bicycle handling.
- Inspect mounting hardware and construction quality.
- Review security needs around your usual parking locations.
- Test the loaded setup before committing to longer rides.
This process shifts attention from marketing claims toward practical performance. It also helps you avoid paying for features that do not improve your riding experience.
How To Build a Commuting Setup
A dependable commuting setup should handle your daily cargo without affecting comfort. For many riders, rear panniers provide the main storage while a small frame bag handles essentials.
Keep your laptop or work documents inside a protected compartment. Place heavier items low, and keep frequently used items near the opening.
Carry basic repair equipment separately from clothing and food. That separation keeps dirty tools away from items that need to stay clean.
If you commute in changing weather, reserve a dedicated compartment for rain gear. You can then reach your jacket quickly without disturbing other cargo.

How To Build a Touring Setup
Touring requires more careful organization because you may carry everything needed for several days. Start by separating equipment according to function.
Use larger panniers for clothing, food, and camping equipment. Then use smaller bags for tools, snacks, navigation equipment, and personal essentials.
Keep heavy equipment low whenever possible. Also, balance the left and right sides to maintain predictable handling.
Before departure, ride with the complete load. Adjust the position until steering, braking, and pedaling feel natural.
Final Buying Checklist
Before purchasing any bike bag, run through a final practical check. A few minutes of comparison can prevent an expensive mismatch.
Ask yourself these questions:
- Does the bag hold everything I normally carry?
- Can my bicycle support the mounting system?
- Will my heels, wheels, brakes, or cables clear the bag?
- Can I remove the bag easily when I reach my destination?
- Will the materials handle my normal weather conditions?
- Can I reach important items without unpacking everything?
- Does the loaded bag keep the bicycle stable?
- Can I carry the bag comfortably after parking?
- Does the design suit commuting, touring, or both?
If the answer remains yes across these areas, you likely have a suitable setup. The goal is not maximum storage, but useful storage that works naturally with your riding.
FAQs
What type of bike bag works best for commuting?
Rear panniers usually work best for commuting because they carry substantial cargo without loading your back.
How many liters should a commuting bike bag hold?
Most daily commuters can start around 15 to 25 liters, then adjust capacity based on their regular cargo.
Are waterproof bike bags worth using?
Yes, waterproof bags provide valuable protection when rain, road spray, or wet conditions threaten your belongings.
Can I use commuting bags for touring?
Yes, commuting bags can work for touring when their capacity, durability, mounting system, and weather protection meet your trip requirements.
Should bike bags sit on the front or rear?
Rear bags suit heavier everyday loads, while front bags can help distribute weight during longer touring trips.
Conclusion
Choosing bike bags becomes easier when you start with your riding needs rather than product features. Match capacity, bag type, mounting hardware, weather protection, access, and weight distribution to your routine.
For most commuters, reliable panniers offer a practical starting point. Touring riders can build a more flexible system by combining panniers with smaller frame and handlebar bags.
Before buying, load your expected gear and consider how the bicycle will handle it. A well chosen setup should make carrying your belongings easier without making your ride feel complicated.
Use this guide to assess your cargo, bicycle, route, and storage needs before purchasing. Then build a bike bag system that supports the way you actually ride.