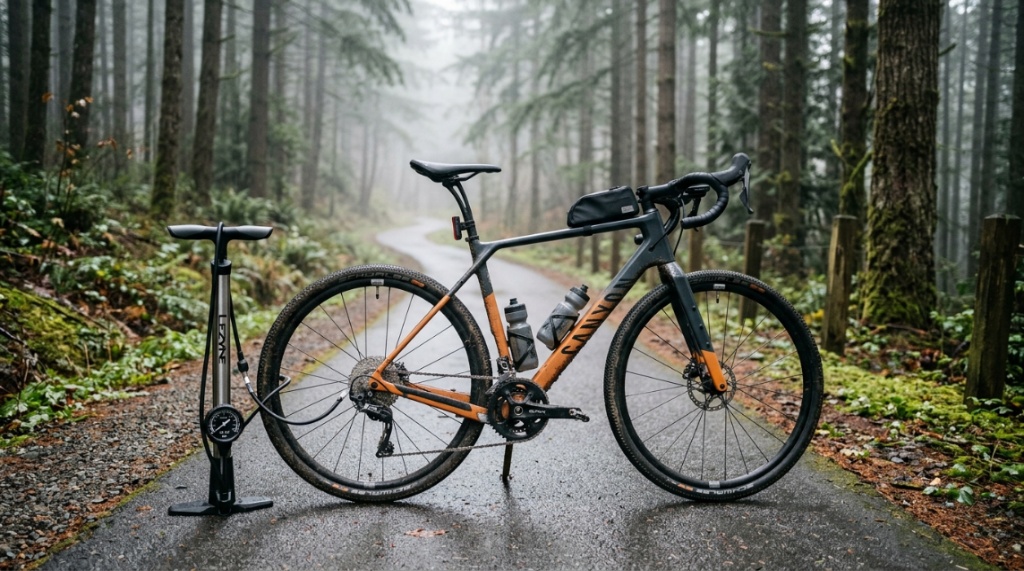
Washington’s cycling terrain shifts dramatically from the rain-soaked roads of Seattle to the rugged volcanic trails of Mount Rainier and the dry, dusty singletrack of eastern Washington. This unique diversity means a standard gas station air chuck simply will not cut it. Riders here face wet conditions that can corrode cheap valves, high altitudes that demand precise PSI adjustments, and frequent tire punctures from roadside debris. A dedicated top bike tire pump Washington must offer corrosion-resistant materials, a reliable pressure gauge, and the versatility to handle Presta, Schrader, and even Dunlop valves common on touring bikes. Without the right pump, you risk being stranded with a flat tire miles from the nearest bike shop, especially during a sudden Pacific Northwest downpour.
The Unique Demands of Pacific Northwest Riding
Washington’s climate is a pump killer. Rain and mud accelerate rust on metal barrels and valve heads, so opting for a pump with an anodized aluminum barrel or a composite body is essential. Additionally, the region’s steep climbs and descents require frequent pressure adjustments. A pump with a bleed valve or easy pressure release mechanism allows you to fine-tune traction on slick roots or loose gravel without fumbling with tiny valve cores.
Common Cycling Disciplines Across Washington
From the paved Burke-Gilman Trail in Seattle to the technical black diamond trails at Tiger Mountain, Washington cyclists ride everything. A pump suitable for a road cyclist running 100 PSI may be overkill for a mountain biker needing 25 PSI. Your pump selection must align with your primary riding style. Commuters often prioritize compact frame-fit pumps, while gravel riders benefit from a high-volume floor pump with a robust gauge.
What Are the Essential Features of a High-Performance Tire Pump?
A pump is only as good as its construction and design. Prioritize models with a brass or steel valve head, as plastic heads crack under pressure, especially in cold Washington mornings. Look for a dual-head valve that flips between Presta and Schrader without needing adapters. A built-in pressure gauge is non-negotiable for accurate inflation, particularly for tubeless tire setups that require precise seating of the bead. Finally, a stable base—whether a wide floor plate or a reinforced handle on a mini pump—prevents the pump from tipping over on wet pavement.
Materials That Resist Washington Weather
Stainless steel internals are a must. Many budget pumps use zinc-plated components that corrode quickly. A pump with sealed bearings in the piston mechanism will operate smoothly even after exposure to road salt and moisture. The hose should be rubber-reinforced rather than cheap PVC, which becomes stiff and cracks in cold temperatures.
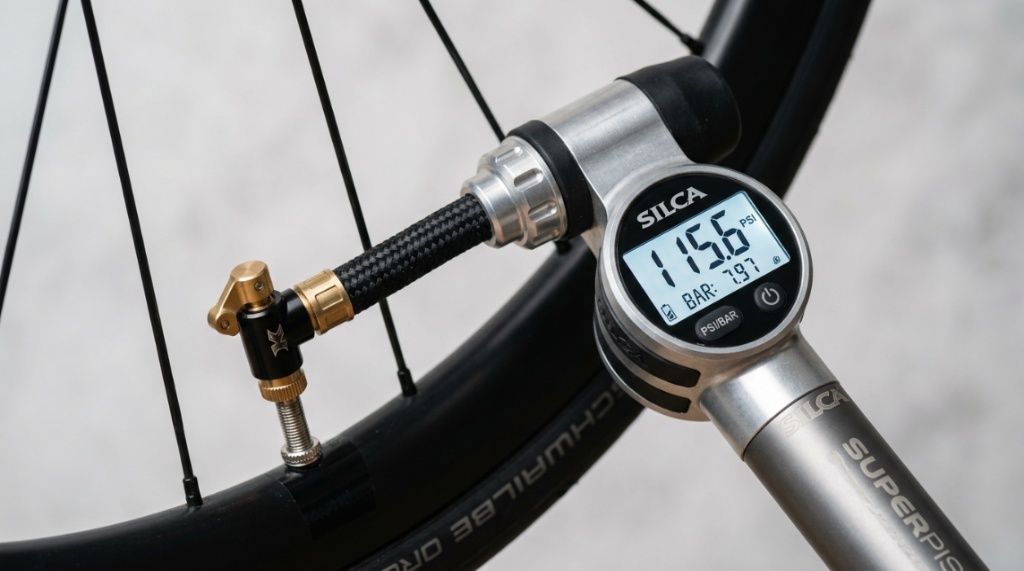
Gauge Accuracy and Readability
A gauge that is off by even 5 PSI can ruin a ride. Look for a dial gauge with a clear lens and large markings, or a digital gauge that updates in real-time. For Washington’s technical trails, a pump with a bleed button lets you release excess air precisely, giving you the control needed for optimal traction.
Volume vs. Pressure: Matching Pump Type to Your Tires
A high-volume pump moves a lot of air quickly, ideal for the wide 2.5-to-3-inch tires on a mountain bike. A high-pressure pump is designed for narrow road tires, though it takes more strokes to fill a large tire. Some premium pumps offer both modes via a switch or interchangeable barrel, making them a versatile choice for Washington riders with multiple bikes.
Which Pump Type Is Best for Your Washington Riding Style?
Your decision comes down to where you ride most frequently. For daily commuters who park outside, a compact mini pump with a flexible hose and frame mount is the most practical. For weekend warriors driving to trailheads, a sturdy floor pump with a storage case is a better investment. The best pump is the one you actually carry or use before every ride. Riders who frequently travel to remote areas like the Olympic Peninsula may prefer a CO2 inflator as a backup, but a quality hand pump remains the most reliable solution for multiple flats or a slow leak discovered mid-ride.
Floor Pumps for the Home Mechanic
A quality floor pump, or track pump, is the backbone of any bike maintenance setup. It delivers consistent, high-volume air efficiently. For Washington homes, choose a pump with a non-slip rubber base that stays put on garage floors or wooden decks. A pump with a long, braided hose makes it easy to reach both valves without bending the wheel. Many top-tier floor pumps now include a digital gauge that can be calibrated for extreme accuracy, a must for tubeless setups on the rocky trails of the Cascades.
Mini and Frame Pumps for On-the-Go Reliability
Frame pumps are designed to be carried on the bike and used in the field. Look for a pump with a telescoping barrel or a folding T-handle that provides enough leverage to pump a tire up to riding pressure. Some modern mini pumps are small enough to fit in a jersey pocket yet powerful enough to inflate a 29×2.4 inch tire from flat to 30 PSI in under 200 strokes. A pump with a secure frame bracket prevents it from rattling loose on bumpy descents.
CO2 Inflators: The Speed Option
CO2 inflators are incredibly fast but are a one-shot tool. They are ideal for racing or when you need to get back on the trail quickly. However, CO2 expands and contracts with temperature, meaning a tire filled with CO2 on a cold day in the North Cascades might read perfectly at the trailhead but become overinflated as the sun warms the pavement. Always carry a backup hand pump when relying on CO2, as a single cartridge may not fully seat a stubborn tubeless tire bead.
How to Choose a Pump Compatible with Tubeless Tires
If you ride on Washington’s rocky, root-laden trails, you likely have a tubeless setup. Inflating a tubeless tire from scratch requires a sudden, high-volume burst of air to seat the tire bead against the rim. A standard floor pump can struggle with this task. Look for a pump specifically designed for tubeless tires, often labeled as “high-volume” or “air shot” compatible. These pumps have a larger chamber that stores air, then releases it in one powerful blast. Alternatively, many riders use a dedicated floor pump that can generate enough steady pressure to gradually encourage the bead to seat. If you choose a mini pump for trail-side tubeless repairs, ensure it has a high-flow head that doesn’t restrict air movement.
Understanding Air Volume and Pressure for Tubeless
For tubeless tires, you need to move a lot of air quickly but not necessarily at high pressure. A pump with a large diameter barrel (around 1.5 inches) is ideal for volume. Once the tire is seated, you can often remove the valve core with a special tool to inflate even faster, as the core itself acts as a restrictor. Some pumps feature a “tubeless mode” that bypasses the core completely.
Presta Valve Adapters and Sealant Considerations
Tubeless setups almost exclusively use Presta valves, and some valves have removable cores. Your pump head must securely grip the smooth metal of the Presta valve without damaging the threads. A pump head with a rubber grommet insert provides a better seal than a simple metal clamp. When topping off tubeless tires, be careful not to introduce moisture into the valve, as sealant can sometimes clog the valve stem.
Which Pumps Offer the Best Durability for Rainy Climates?
The Pacific Northwest is notorious for its damp environment, which can quickly degrade inferior pump materials. The most durable pumps for Washington weather feature anodized or powder-coated aluminum barrels that resist oxidation. The internal piston should either be made of brass or have a Teflon-coated sleeve for smooth, corrosion-free operation. The valve head must be constructed from reinforced nylon or machined brass, as plastic heads become brittle and crack in cold rain. A pump with a sealed, weatherproof gauge is a significant advantage, preventing fogging and internal moisture damage. Brands that offer rebuild kits for their pumps demonstrate a confidence in long-term durability, allowing you to replace seals and o-rings rather than buying a new pump every few seasons.
Seals and O-Rings: The Unsung Heroes
The rubber seals inside the pump barrel are the first components to fail. Look for pumps that use double O-ring seals or a cup seal design. These create a better air seal and last longer than simple single-ring systems. Carrying a spare O-ring in your repair kit is a cheap insurance policy for a critical component.
Handle and Grip Considerations in Wet Conditions
Foam handles absorb water and become soggy over time, leading to them peeling off or developing mold. A rubber or textured plastic handle is far more hygienic and durable for daily use in a wet climate. The handle should also be ergonomically designed to prevent hand fatigue when inflating large-volume tires.
How to Test a Pump Before You Buy in Washington
While online shopping is convenient, testing a pump in person at a local bike shop (like one of the many excellent shops in Seattle, Spokane, or Bellingham) provides invaluable insight. First, check the pump’s stability. Place it on the floor and attempt to push it over. A good pump should feel planted. Second, test the valve head fitment. Attach it to a wheel in the shop to ensure it clamps securely and doesn’t leak. Third, feel the action. The handle should move smoothly without catching or requiring excessive force. Finally, verify the gauge accuracy. Inflate a tire and compare the reading to a known accurate digital gauge. If the shop doesn’t have a separate gauge, ask if you can test it on your own bike.
Checking for Valve Compatibility Immediately
Bring a wheel with you if possible. Test the pump with both Presta and Schrader valves. Ensure the pump head locks onto the Presta valve without stripping the delicate brass threads. A twisting action to lock the head is often more secure than a simple press-fit design, which can pop off under high pressure.
The “Trailside Repair” Simulation
If you are buying a mini pump, simulate a trailside flat. Deflate a tire to zero pressure and see how many strokes it takes to get to a rideable pressure (20-30 PSI for a mountain bike). A pump that takes 400 strokes will be frustrating on a cold, rainy trail. A good mini pump should manage in under 200 strokes.
What Is the Best Pump for Washington’s Gravel Roads?
Gravel riding is booming in Washington, with routes like the Olympic Discovery Trail and the Palouse to Cascades Trail offering endless miles of mixed surface riding. Gravel riders need a versatile pump that can handle moderately high pressure (40-60 PSI) for the pavement sections while also moving significant volume for the wide tires used on loose gravel. A floor pump with a large barrel and a precise gauge is ideal for home use, while a frame pump with a long barrel is the best companion for a long day in the saddle. The pump must be able to handle the fine dust and dirt that gets kicked up on gravel roads without jamming.
Pressure Range for Mixed Terrain
Gravel tires often run between 30 and 55 PSI depending on rider weight and surface conditions. Your pump should be capable of reaching 60 PSI easily but should also be accurate in the lower ranges. A pump with a dual-scale gauge (showing both PSI and BAR) is helpful for fine-tuning.
Portability vs. Performance for Long Rides
For all-day gravel rides, weight and bulk matter. A compact, high-volume mini pump that fits in a frame bag is preferable to a full-size floor pump. Some gravel-specific pumps feature a two-stage action: high volume for the first part of the stroke, then high pressure for the final few PSI. This design significantly reduces pumping time.
How to Maintain Your Bike Pump for Long-Term Use
Your pump is a mechanical tool and requires basic maintenance to ensure it continues to perform in Washington’s harsh conditions. After every ride in wet weather, wipe down the barrel and handle to remove moisture and grit. Periodically, apply a small amount of silicone grease to the O-ring seals inside the barrel to keep them supple and improve the seal. Each season, disassemble the pump head (if possible) and clean out any debris that may have accumulated. Check the hose for cracks where it connects to the head and the barrel. If the gauge starts to stick or read inaccurately, it may be time for a replacement, though some high-end pumps allow for gauge replacement.
Winter Storage Tips
During the off-season, store your pump inside your home, not in a freezing garage. Extreme cold can harden rubber seals and cause plastic components to become brittle. Store the pump with the handle slightly depressed to relieve tension on the internal spring.
Replacing Seals and O-Rings
Many pump manufacturers offer small service kits containing all the necessary seals and O-rings. Buying a spare kit when you purchase your pump ensures you are never caught off guard. Replacing these seals is a simple task that restores your pump to like-new condition.
What Are the Expert Recommendations for Washington Riders?
After testing numerous pumps in varying conditions from the rain forests of the Hoh River to the high desert of the Columbia River Gorge, certain features consistently outperform others. For a floor pump, look for a model with a large, easy-to-read gauge, a robust base with rubber feet, and a brass valve head with a comfortable lever to lock it on. For a portable pump, a telescoping barrel design that offers both volume and pressure modes is a game-changer. Many local Washington bike shops recommend pumps with lifetime warranties, as they stand behind their products even after years of use. For a curated selection of proven performers, consulting a resource dedicated to the top bike tire pump Washington options can save you hours of research and ensure you are getting a pump that is tested and trusted by local cyclists.
Prioritize a Pump with a Flexible Hose
A rigid pump head that sticks straight out from the valve can be extremely difficult to use on wheels with deep aero rims or disc brakes that eat up space. A pump with a short, braided hose allows you to place the pump on the ground while keeping the head straight on the valve, reducing the risk of bending or snapping the valve stem.
Why a Bleed Valve Is a Game-Changer
The ability to bleed off excess pressure without detaching the pump head is a feature that separates mid-range pumps from premium ones. When you overshoot your target PSI, a simple press of a button releases air, saving you the hassle of reattaching the pump and fiddling with the valve core. This is particularly useful for tubeless setups where you are seeking a specific feel, When riding the diverse and often damp terrain of the Pacific Northwest, your tire pressure can make or break your traction. Just as knowing Choose the Right Trail Bike sets your foundation, selecting a pump that can handle high-volume trail tires or high-pressure road setups ensures you are never stranded in the elements.
Frequently Asked Questions
Can I use a bike pump for my car tires in an emergency?
Technically yes, but it is not recommended. Bike pumps are designed for much smaller volumes and higher pressures. Inflating a car tire from flat would take hundreds of strokes and could overheat a mini pump. It is best to carry a dedicated 12V car compressor for automotive emergencies.
How often should I replace my bike tire pump?
With proper maintenance, a quality floor pump can last 10-15 years. Mini pumps may have a shorter lifespan, around 5-8 years, due to wear on seals and moving parts. Replace a pump immediately if you notice air leaking from the barrel or around the handle, as this indicates seal failure.
What is the difference between Presta and Schrader valves?
Schrader valves are the same type found on car tires and are wider with a spring-loaded pin. Presta valves are narrower, have a lock nut at the top, and are standard on higher-end road and mountain bikes. Most quality pumps handle both, but always check compatibility before purchasing.
Is a digital gauge better than an analog gauge on a bike pump?
Digital gauges are generally more accurate and easier to read in low light, making them ideal for precise tubeless setups. Analog dial gauges are durable and do not require batteries. For most Washington riders, a high-quality analog gauge is sufficient, but a digital gauge is a valuable upgrade for the meticulous mechanic.
Can a mini pump inflate a tire to full road pressure (100+ PSI)?
Some high-end mini pumps can, but it requires significant effort. Most mini pumps are best suited for getting a tire to a safe riding pressure after a flat, often 60-80 PSI. For daily use, a floor pump is far more efficient for achieving high pressures.
Why does my pump feel hard to push when inflating?
This is normal when inflating high-pressure tires, as the air inside the tire pushes back against the pump piston. A pump with a larger barrel diameter will feel harder to push but moves more air per stroke. A pump with a narrower barrel is easier to push but requires more strokes.
How do I prevent my pump head from damaging my valve stem?
Always wet the valve stem or the pump head grommet slightly before attaching. This lubrication reduces friction and prevents tearing the rubber seal or stripping metal threads. Also, avoid using excessive force when turning the locking lever on the pump head.