A bike brake is an important mechanism for controlling your bike. A properly working brake can ensure safety, while a poorly-working one may lead to serious accidents. Adjusting the brakes of your bicycle allows you to fine-tune them in order to achieve maximum stopping power, which is especially useful if your bike tends to wear down its shoes unevenly. In this article, we will give you a step-by-step procedure for adjusting your bike brakes.
How to adjust bike brakes?

1. Brake pads need to be set a bit higher than the wheel rim so they slightly drag on it when released. If you can’t move your brake levers without excessive force, loosen your brake lever mounting nut and carefully bend the brake caliper arms outward as needed. Retighten your brake lever mounting nut.
2. After proper adjustment, it is important to “bed in” the brake pads and rims by making several tests stops from increasing speeds until you achieve full stopping power. You will need to make 10-15 stops (ideally down an increasing slope) while applying only moderate force on the levers; allowing the brakes to take hold naturally.
3. Finally, check that your brake pads are bedded-in by attempting to drag your fully applied brakes on dry pavement (versus wet, muddy or dusty streets). If they stop your bike immediately you should be okay. Once you have established proper brake function, perform another quick visual inspection of the brake cables and housings for fraying or other damage.
4. If you do not regularly ride your bicycle, it is advisable to give the brake system a thorough inspection at least once every month. Remember that brake pads are consumable components and will need replacement regularly (depending on how often you ride). Also, remember to regularly lubricate your cables especially if they are exposed to the elements.
5. Adjust your brake pads so that they are 2mm from the wheel rim when applied, this means they will require a bit of force to apply and release them but not so much as to damage the rim or tire.
6. An important part of setting up bicycle brakes is making sure they have enough clearance between the rims and the pads. The brake shoes need to be wide enough apart to allow the rim between them, though not so far as to jam against each other when forced together by hard pedaling. This will only happen with a very tight steering tube set up or a bike that is way too small for you.
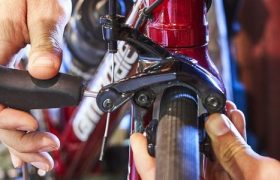
7. To adjust your rim brakes, release any cable tension at the brake levers and insert a 2mm Allen key into the bolt which holds the brake shoe to its mounting point on the frame or fork.
This is best done with an Allen key which has a ball end because it will prevent you from scratching your rims as you tighten by feeling alone.
8. Both sides of the brake should be adjusted equally so the wheel spins true. Once you have set your brakes up, make sure they hold firmly by riding at high speed and applying full braking power before releasing the bike to a stop.
9. If this doesn’t work, shift down into an easier gear; if it still doesn’t work, check your brake levers to see if they are properly connected. If you have caliper brakes, make sure the cable runs smoothly through the spring or spring-loaded arm on each side of the bike.
10. Check that the smaller centering screw on each end is adjusted correctly – it should push up against its spring with just enough force to center the brake shoes to the rim. If you find that the calipers are not centered on your wheel rims, tighten or loosen each pad positioning bolt accordingly.
11. The mounting bolt should be tightened securely; if it’s too tight, it could warp (bend) the brake shoe and/or make it difficult to adjust later. Make sure that the brake adjusters are not backed all the way out, allowing the brake shoes to project too far from their holders, because this could make it difficult to center your brakes on your rims.
12. If you find that the rear brake is rubbing up against your tire or other parts of your bike when applying light pressure with an open hand, your levers are too low and you should raise them accordingly.
13. Make sure that the brake shoes are not rubbing against each other or resting on the tire when closed; try leaning your bike on its kickstand to allow gravity to push the brakes down further.
14. If after making these adjustments your caliper brakes still rub on the tire when closed, you may need to readjust the tension on your brake cable. There should be no play in the wire at this point – if there is, tighten it by turning your barrel adjuster a half-turn or so.
Conclusion
There are a lot of things to remember when adjusting your brakes, but it’s usually a simple job that only requires a little know-how and patience. The most important thing is to ensure that the brake shoes have enough clearance from the rim, so they won’t rub or catch on it under pressure.